Small sample environmental testing looks simple from the outside. A few circuit boards, sensors, plastic parts, coatings, battery parts, or medical device components are placed inside a compact chamber, the program starts, and the results appear several hours or days later. In practice, the smallest samples often create the largest measurement problems.
A benchtop environmental chamber has limited internal volume, fast thermal response, and close airflow paths. That makes it useful for R&D labs, incoming material checks, electronic component screening, and early product validation. It also means poor sample placement, blocked airflow, wrong humidity settings, or frequent door opening can change the result enough to cause false failures or false passes.
Sample location is not a small detail. In a benchtop temperature humidity chamber, the distance between the specimen, chamber wall, shelf, and air outlet affects how much heat and moisture reaches the sample surface.
Chamber walls are not the same as the controlled air zone. During low-temperature tests, wall surfaces may be colder than the air. During high-temperature tests, the wall can store heat and radiate it back to nearby parts. A small sensor housing placed directly against the side wall may show a different response than the same housing placed in the central airflow zone.
For reliable benchtop chamber testing, samples should be kept at least 5 cm away from the inner wall. This gap reduces wall-effect errors and gives circulating air enough room to pass around the specimen.
Stacking small parts saves time, but it can turn one test into several hidden tests. The top sample may receive direct airflow, while the lower sample sits in a warm, humid pocket. If labels, rubber pads, PCB assemblies, or coated coupons touch each other, moisture transfer and heat conduction can distort the result.
LIB engineers recommend leaving 2–3 cm between individual samples. For flat coupons, use racks that hold them vertically or at a slight angle, rather than laying them in a dense pile.
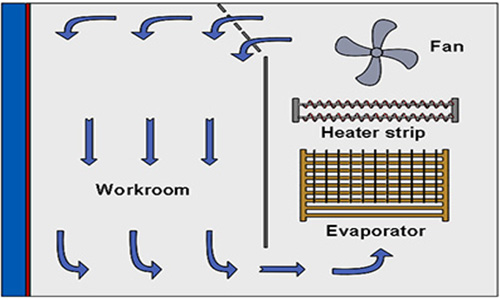
Airflow is the working medium of an environmental test chamber. Temperature and humidity are controlled by moving conditioned air across the test space. When airflow is blocked, the controller may show the correct chamber value while the sample sees a different condition.
Blocked airflow can cause:
· Slow sample stabilization
· Local hot or cold spots
· Uneven humidity exposure
· Condensation on one side of a sample
· Poor repeatability between test batches
For example, a batch of small plastic connectors placed in a solid tray may pass a 40°C and 93% RH test because the tray shields the lower parts from direct moisture exposure. When the same connectors are later installed in a product, they may absorb more moisture than the lab result suggested.
Use perforated shelves, open racks, or mesh fixtures where possible. Do not place samples directly in front of supply or return air openings. Keep cables tied neatly and routed through a cable port instead of letting them hang in the airflow path.
LIB benchtop environmental chambers use supply-and-return air circulation with perforated shelving to support more even air distribution, even when several small samples are tested in one run.
A compact chamber is not a storage cabinet. Filling every available space may look efficient, but it often reduces test quality.
Every sample has thermal mass. Metal parts, potted electronics, batteries, and dense polymers absorb heat slowly. If too many are loaded at once, the chamber needs more time to reach stable conditions. Humidity control may also become uneven because the sample load changes moisture absorption inside the chamber.
Some humidity standards require the test chamber volume to be at least five times the total volume of the test specimens. This rule is especially useful for small equipment, assemblies, and heat-dissipating parts because it leaves enough free air volume for stable conditioning.
For 50L and 80L benchtop chambers, choose the chamber size based on the real fixture layout, not only the outer sample dimensions. Leave free space above, below, and around the sample rack. If wires, support frames, loading trays, or sensors are used, count them as part of the test load.
 A benchtop emvrionmental chamber can run many profiles, but not every profile is meaningful. Test conditions should come from a product standard, customer specification, material requirement, or field-use condition.
Common environmental chamber testing standards include the following conditions:
Standard or Test Method | Typical Parameters | Common Use |
IEC 60068-2-78 damp heat, steady state | 30°C or 40°C, 85–93% RH; durations such as 12 h, 24 h, 2 d, 4 d, 10 d, 21 d, or 56 d | Electronics, components, small equipment |
IEC 60068-2-30 damp heat, cyclic | 25°C to 55°C with RH not less than 95%; 24 h cycle | Condensation resistance, tropical climate simulation |
ASTM D2247 | Around 38°C at 100% RH with condensation on coated surfaces | Coatings, painted panels, treated substrates |
JEDEC-style 85/85 testing | 85°C and 85% RH, often with electrical bias for devices | Semiconductor and electronic reliability |
A setting such as 60°C and 90% RH may be severe, but severity alone does not make a good test. The condition must match the failure mode being studied.
Test duration should start after the sample reaches the specified condition, not simply when the chamber display reaches the setpoint. A small plastic cap may stabilize quickly. A potted sensor module or metal block may lag behind the chamber air by 20 minutes, 60 minutes, or longer.
For qualification work, record the stabilization rule in the test report. For critical samples, attach a sensor to the sample body or insert a probe near the sample core.
Humidity testing is often misunderstood. High humidity and condensation are not the same test condition. Some standards require no condensation, while others deliberately create it.
Condensation forms when the sample surface is colder than the surrounding moist air. This can happen during ramp-up, after door opening, or when a dense sample warms more slowly than the chamber air. On small electronic parts, droplets can bridge conductors, weaken insulation resistance, or leave mineral residue after drying.
IEC 60068-2-78 steady-state damp heat is generally used to study high humidity without condensation. ASTM D2247, by contrast, relies on 100% RH and condensation to evaluate water resistance of coatings.
Match the test profile to the standard. Use slower transitions for moisture-sensitive parts. Avoid placing cold samples into a warm humid chamber. Do not put samples under surfaces where water may drip.
LIB temperature humidity chambers use an anti-condensation insulated glass viewing window and intelligent dehumidification control to reduce the risk of water droplets falling directly onto samples during humidity testing.
Ramp rate controls how fast the chamber moves from one temperature to another. It affects thermal stress, condensation risk, and sample lag.
A 3°C/min ramp can expose plastics, solder joints, adhesives, seals, and coatings to a different stress than a 1°C/min ramp. Small samples may follow the chamber air quickly, while dense samples respond slowly. If the ramp rate is not reported, the test may be hard to repeat.
Use the ramp rate required by the test standard or customer specification. When no rate is given, choose a rate that matches the product’s field condition.
LIB benchtop chambers support a heating rate of 3°C/min and a cooling rate of 1°C/min, with custom ramp rates available for temperature cycling and fast-change tests. This helps labs test materials with different thermal shock sensitivity.
Opening the chamber door is one of the fastest ways to damage test stability. Even a short opening can cause a large disturbance in a small chamber.
When the door opens, conditioned air escapes and room air enters. At low temperature, frost may form. At high humidity, room air can change the moisture balance. In a compact chamber, the air volume is small, so recovery may take longer than expected compared with the total test time.
For an 85°C and 85% RH test, a short door opening can trigger condensation on cooler sample surfaces. For a low-temperature test, it can add moisture that later freezes on the evaporator or specimen.
Plan inspections before the test starts. Use the observation window whenever possible. If mid-test access is required, pause the test, record the time and chamber values, keep the opening short, then allow the chamber and sample to restabilize before continuing the exposure count.
 The chamber controller measures chamber air. It does not always represent the sample core, solder joint, coating layer, adhesive line, or battery cell surface.
Air changes quickly. Samples change more slowly. A 50 g aluminum part may lag far behind the display during heating and cooling. A plastic part with low thermal conductivity may show a surface temperature close to the air while its core remains cooler.
This difference matters when the pass/fail rule depends on exposure time. A test listed as 2 hours at -40°C should not be counted before the sample actually reaches the target condition.
Use sample sensors when testing dense parts, powered electronics, batteries, sealed modules, or samples with known thermal lag. Attach the sensor in a repeatable way: tape, clamp, or embedded probe, depending on the material.
LIB benchtop environmental chambers can be configured with external sample temperature sensors and custom cable ports, allowing real-time sample temperature logging and test report data recording.
A reliable small climate chamber can still produce bad data if it is poorly maintained. Sensors drift. Door gaskets wear. Humidity systems collect residue. Air filters clog.
Temperature fluctuation and deviation values are meaningful only when sensors are calibrated. LIB benchtop environmental chambers provide temperature fluctuation of ±0.5°C, temperature deviation of ±2.0°C, humidity range from 20% to 98% RH, and humidity deviation of ±2.5% RH. These values support repeatable testing, but calibration records are still needed for audits and customer reports.
A practical maintenance plan should include:
· Checking door seals and latch pressure
· Cleaning the chamber interior after humidity tests
· Inspecting shelves, cable ports, and drain paths
· Using clean water for humidity operation
· Reviewing alarm history after long tests
· Scheduling periodic sensor calibration
LIB provides regular calibration reminder support, remote diagnostic assistance, and an English-speaking after-sales team available 5×12 for global users.
The right chamber is the one that fits the sample, fixture, cable routing, standard, and workflow. Internal volume alone is not enough.
A 50L chamber is often suitable for small sensors, PCB coupons, connectors, compact plastic parts, small coating panels, and benchtop R&D tasks. An 80L chamber gives more room for larger fixtures, more spacing between samples, and better cable management for powered testing.
When comparing 50L and 80L chambers, check internal dimensions, not only volume. A long sample may need the larger chamber even when its total volume is small.
Humidity control, cable ports, sample sensors, viewing windows, shelves, and custom fixtures should be selected before purchase. A chamber used for passive plastic aging may need a different setup than a chamber used for powered electronic assemblies under 85/85 conditions.
| benchtop environmental chamber mini temperature humidity chambers Mini Temperature Humidity Environmental Control Chambers | |||||
A simple checklist prevents many repeat-test costs. It also makes reports easier to defend when a customer or auditor asks how the test was run.
Confirm the standard, temperature, humidity, duration, ramp rate, and pass/fail criteria. Check calibration status. Place samples at least 5 cm from chamber walls and leave 2–3 cm between samples. Make sure the shelf or fixture does not block airflow.
Avoid opening the door. Watch for condensation, abnormal alarms, long stabilization time, or unexpected sample behavior. When powered samples are tested, monitor both chamber conditions and sample temperature.
Record final chamber data, sample appearance, recovery time, and any interruption. For coatings, note blistering, softening, adhesion loss, or discoloration. For electronics, record functional checks, insulation resistance, visible corrosion, and connector condition.
Ready-to-ship benchtop environmental chambers for fast delivery
Free consultation to match your exact testing needs
Designed to meet IEC 60068, MIL-STD-810, ASTM standards
Fast availability reduces project downtime
3-year warranty with lifetime technical support
Remote assistance, calibration reminders, and spare parts support
LIB industry provides reliable benchtop environmental chambers for accurate temperature and humidity testing. With stable performance, fast delivery, and full after-sales support, we help laboratories improve testing efficiency and reduce downtime.
With optimized airflow systems, programmable control, and customizable configurations, these solutions support a wide range of laboratory applications.
Contact LIB industry today to find the right chamber for your testing requirements.
Place samples in the central working area, keep at least 5 cm from chamber walls, leave 2–3 cm between samples, and avoid blocking supply or return airflow. Select the temperature, humidity, ramp rate, and duration from the relevant test standard or customer requirement.
Samples should be placed away from walls, doors, air outlets, and return vents. The best position is usually on a perforated shelf in the main airflow zone, with enough open space around every sample surface.
Common causes include overloaded chambers, blocked airflow, poor sample spacing, wrong humidity settings, unreported ramp rates, door opening during the test, sensor drift, and counting exposure time before the sample has stabilized.
Use the correct humidity profile, avoid putting cold samples into warm humid air, control ramp rates, keep samples away from drip paths, and allow the chamber to stabilize. For non-condensing damp heat tests, conditions such as 40°C and 93% RH should be managed carefully.
A 50L chamber is usually enough for small parts, PCB coupons, sensors, and compact material samples. An 80L chamber is better when fixtures, cables, larger spacing, or multiple sample groups are needed. The sample layout should decide the chamber size.

 English
 русский
 français
 العربية
 Deutsch
 Español
 한국어
한국어 italiano
 tiếng việt
 ไทย
ไทย Indonesia


.webp "BS EN 50289-4-17 / UL 1581 Xenon Arc Weathering Cable Test Chamber")